Pick Your Own Meal Series: Grilled Vegetable Pasta Salad

We are featuring our next Pick Your Own (PYO) meal, Grilled Vegetable Pasta Salad. Craving pasta…but also wanting something summery and fresh? Presenting the long weekend Grilled Vegetable Pasta Salad, because it ages like fine wine, feeds a crowd, and you grill the veg on a barbecue which is perfect for keeping your house cool during those hot days. 

We made this salad to go with a BBQ meal including steak, halloumi, and tofu, which provided protein, but you could always add protein of your choice directly to the salad. Things like tuna, or chicken would work great!

Please tag us on Instagram (@thamesrivermelons) if you try this recipe!

Look at all the veggies!

Recipe

*Serves 10 - 12

Ingredients

2-3 Thames River Melons zucchini 

2-3 cups Thames River Melons grape tomatoes

½ medium Thames River Melons red onion

1 Thames River Melons red bell pepper

2 cups arugula 

½  cup capers

½ kalamata olives 

200g of dried pasta (we are using penne)

200g of feta 

1 tsp salt (for boiling pasta)

For the Dressing

⅓ cup of olive oil 

Salt and pepper

⅓ cup red wine vinegar 

1 tbsp Thames River Melons honey

2 tbsp Thames River Melons garlic scape mustard 

1 cup of fresh Thames River Melons herbs (dill, basil, oregano, etc)- please feel free to add more 


Prepping the produce!

Instructions 

1. Prepare the vegetables, beginning with the zucchini and bell pepper, for grilling. Wash and then cut zucchinis in half lengthwise then half again to get four pieces. Sprinkle salt over the zucchini to help draw excess water out, and set aside.

Cut the red pepper into quarters and set aside.

2. Slice the red onion with the grain and separate, halve the grape tomatoes, and mince fresh herbs. We used dill and basil.

3. Peel, crush and mince 3-4 garlic cloves

4. Dab the zucchini with a paper towel to remove water. Add olive oil, salt and pepper to the zucchini and red pepper, ensuring all is well coated.

5. Add pasta to boiling water and cook according to instructions. 

6. Place the zucchini and red pepper on the BBQ.

7. Begin to assemble the salad. In a large serving bowl, place grape tomatoes, olives, capers, red onion, arugula, dill, basil, and crumbled feta

8. Make the salad dressing. Combine olive oil, minced garlic, dijon mustard, red wine vinegar, honey, salt and pepper and mix

9. Remove the vegetables from the grill.

10. Drain the pasta and set aside to cool slightly.

11. Cut the grilled vegetables into bite sized pieces.

12. Add the pasta, grilled vegetables, and dressing to the serving bowl. Toss and serve.

Grilled Vegetable Pasta Salad

Cost 

The zucchini weighed 1lb. The bell pepper was 0.35lb. The tomatoes were 0.8lb. 

PYO zucchini is $0.50/lb, bell peppers cost $2/lb, and grape tomatoes cost $0.80/lb. 

Therefore, the PYO vegetables in this dish cost approximately $2 in total. 

Storage

This salad will keep in the fridge for 4 days. If planning to store, we recommend keeping the arugula separate and adding at time of consumption. However, dressing the salad is recommended as the pasta and vegetables can marinate over time.

Waste Less Notes 

It is an easy way to incorporate vegetables that may be on their last days of freshness. 

Modifications

This recipe may be modified to suit your needs. You can add or subtract vegetables depending on what is in season and what you have on hand. 

Recipe developed and photographed by dietetic interns Lise Wolyniuk and Lexie Nobbs and reviewed by Alex Chesney, RD

Pick Your Own Meal Series: Breakfast Edition!

Easy Frittata, featuring PYO produce!

Over the summer we are excited to bring you recipes featuring produce from our PYO (Pick Your Own) patch! Each recipe will be easy, delicious, nutritious, and budget friendly. There is no better feeling than picking your own food from the dirt it was grown in and preparing a meal from scratch with it. We look forward to having you visit our farm and try these dishes yourself, using your harvest. The whole experience can be a great activity to enjoy with family or friends. 

Please tag us on Instagram (@thamesrivermelons) if you try any of our PYO recipes – we would love to see them!

Ingredients ready to go!

The first recipe in this series is a breakfast (or brunch) frittata, perfect for hosting on summer weekends, as you can feed a crowd or just a few folks by easily adjusting the recipe up or down.  This is also a host-friendly meal because it’s easy to whip up while guests are gathered, or the frittata can also be made ahead of time. The best part: this recipe uses almost exclusively ingredients from our farm! Right now, our PYO patch is full of kale and zucchini for picking. Our chickens have been busy laying, and you can purchase fresh eggs in our farm shop. We also sell a variety of local cheeses from Gunn’s Hill.

Kale and zucchini are sources of dietary fibre, as well as an abundance of important vitamins and minerals.

Kale contains 2.4 grams of fibre/100 grams. This recipe contains 7.2 grams of fibre in total, from the kale. Kale also contains vitamin C (120 mg/100g), important for immune health, and calcium (150 mg/100g), important for healthy bones and teeth (1). 

Zucchini contains 1 gram of fibre /100 grams, and is a good source of potassium (261 mg/100g) and phosphorus (38 mg/100g), both important electrolytes (1). This recipe contains 3.6 grams of fibre from the zucchini.

Eggs are a complete protein (meaning they contain all 9 essential amino acids that our bodies cannot produce by themselves), helping to keep our bodies functioning optimally, and keep us satiated, with approximately 6-7 grams in a large egg. 

Finally, herbs are an excellent way to provide flavour without the need to add too much salt, plus they add to the visual appeal of a dish. 

Ingredients

Serves 7-8, and can be adjusted up or down as needed. Keep in mind that if you adjust, you will need to adjust the number of eggs and vegetables, to ensure they are proportioned well.

4-5 cloves Thames River Melons garlic, minced (garlic is available for PYO or for purchase at our farm shop)

1/2 cup Spanish onion, chopped (these aren’t ready for picking on our farm just yet, but they will be available in late July)

8 Thames River Melons eggs 

1/3 cup whole milk or heavy cream (using a dairy-free milk alternative is also an option here!)

2 large stalks (300 grams) of Thames River Melons kale, chopped

1 medium (360 grams) Thames River Melons zucchini, chopped into quarter inch pieces 

Salt and pepper to taste

Fresh herbs of your choice (we used Thames River Melons dill and basil

Cheese of your choice (we used shredded mozzarella). 

Instructions

1. Preheat the oven to 400°F.

2. In an oven-safe 12” pan or cast-iron skillet, warm olive oil over medium heat.

3. Prepare vegetables: wash, then chop kale and zucchini, dice onion, and mince garlic. 

Although you can eat the entire kale stalk, it is preferable to ‘devein’ it. Fold the stalk in half to make this more efficient. Slice along the inside edge, from bottom to top. For a demonstration, see video below.

4. In a large bowl, crack eggs, add milk or cream, and whisk gently to combine. The key to get a silky-smooth texture is to avoid over-whisking, which creates bubbles. Set aside. Add salt and pepper to taste if you would like. 

5. Add onion to the warm skillet, and stir occasionally, until translucent and beginning to caramelize. 

6. Add chopped vegetables, and minced garlic. Sauté on medium for approximately 10 minutes, or until tender but still crisp.

Pre-cooking the vegetables ensures your frittata will not be soggy as some moisture in them will have had a chance to evaporate.

7. Remove from the element and pour the egg mixture into the skillet (you may need to tilt the pan to evenly distribute the egg). Do not mix or you will end up with scrambled eggs! 

8. Sprinkle cheese and herbs of your choice over the top (we sell Gunns Hill cheese in our farm shop). You can use gouda, feta, cheddar, anything you like!

9. Cook on medium heat until the edges begin to set (this should not take long; you want to do the majority of the cooking in the oven), and then transfer to the oven to bake for 8 minutes. 

10. Remove the finished frittata from the oven and add a sprinkling of fresh herbs and more cheese to the top if you like. Allow to cool before slicing and serving.

The finished product!

Cost

In total the PYO herbs, zucchini, and kale purchased on the farm cost $3.21 . In general PYO prices are half-price of our pre-picked produce. 

A dozen of our eggs costs $6.00, bringing the total to $9.21.  We only used 8 eggs, so $7.21 is actually more accurate.

Storage

This dish will keep for up to 4 days in an airtight container in the refrigerator, so for a smaller household this is an excellent make-ahead-of-time meal to take for an on-the-go breakfast throughout the week.

Modifications

Other vegetables you can use include bell pepper (available soon in our PYO patch), spinach, asparagus (available in our farm shop, and PYO in the Spring) or Swiss chard. 

We used a 12” pan but you can certainly size down and just use less eggs, cream, and vegetables. Another idea is to divide the frittata mixture in a muffin pan for littles, or for using on breakfast sandwiches between an english muffin.

Recipe and blog post developed and photographed by dietetic intern Lise Wolyniuk and reviewed by Alex Chesney, RD


Reference:

Health Canada. (2023). Canadian Nutrient File. Government of Canada. Retrieved July 12, 2024, from https://food-nutrition.canada.ca/cnf-fce/newSearch .

Stuffed & Air-Fried Zucchini Blossoms

Squash blossoms are found in the cuisine of many cultures, such as Italian and Mediterranean dishes. Often referred to as delicacies, they are typically only found at farmers’ markets, so try to get your hands on them while you can!

Stuffed squash/zucchini blossoms may not be familiar to everyone, but they make for a unique appetizer or addition to many dishes. Our suggestion is to be creative and make them your own! That’s exactly how we approached developing the following recipes, grabbing whatever ingredients we had in the garden and trying a number of unique combinations.

Ingredients: Batter

1 cup all-purpose flour

1 cup water, room temperature

Tip: Prepare the batter with oat flour to make the recipe gluten-free/ Celiac-friendly.

Ingredients: Filling

1 block cream cheese

+ additional spices, herbs, fruits and vegetables (5 variations listed below)

Tip: To have softer cream cheese to work with, remove the block from the fridge about two hours prior.

1. Chocolate Strawberry Cheesecake (4 blossoms)

4 large strawberries

1 teaspoon honey

Topping:

1/4 cup semi-sweet chocolate chips, melted

icing sugar

2. Pumpkin Spice Cheesecake (4 blossoms)

1 tablespoon pumpkin spice

1 teaspoon honey

3. Herb & Garlic (4 blossoms)

1 clove garlic, minced

1 tablespoon fresh parsley, chopped

scant ½ teaspoon dried thyme

1 onion slice, chopped

salt & pepper (to taste)

4. Spicy Dill (4 blossoms)

3 tablespoons fresh dill, finely chopped

½ teaspoon red pepper chili flakes

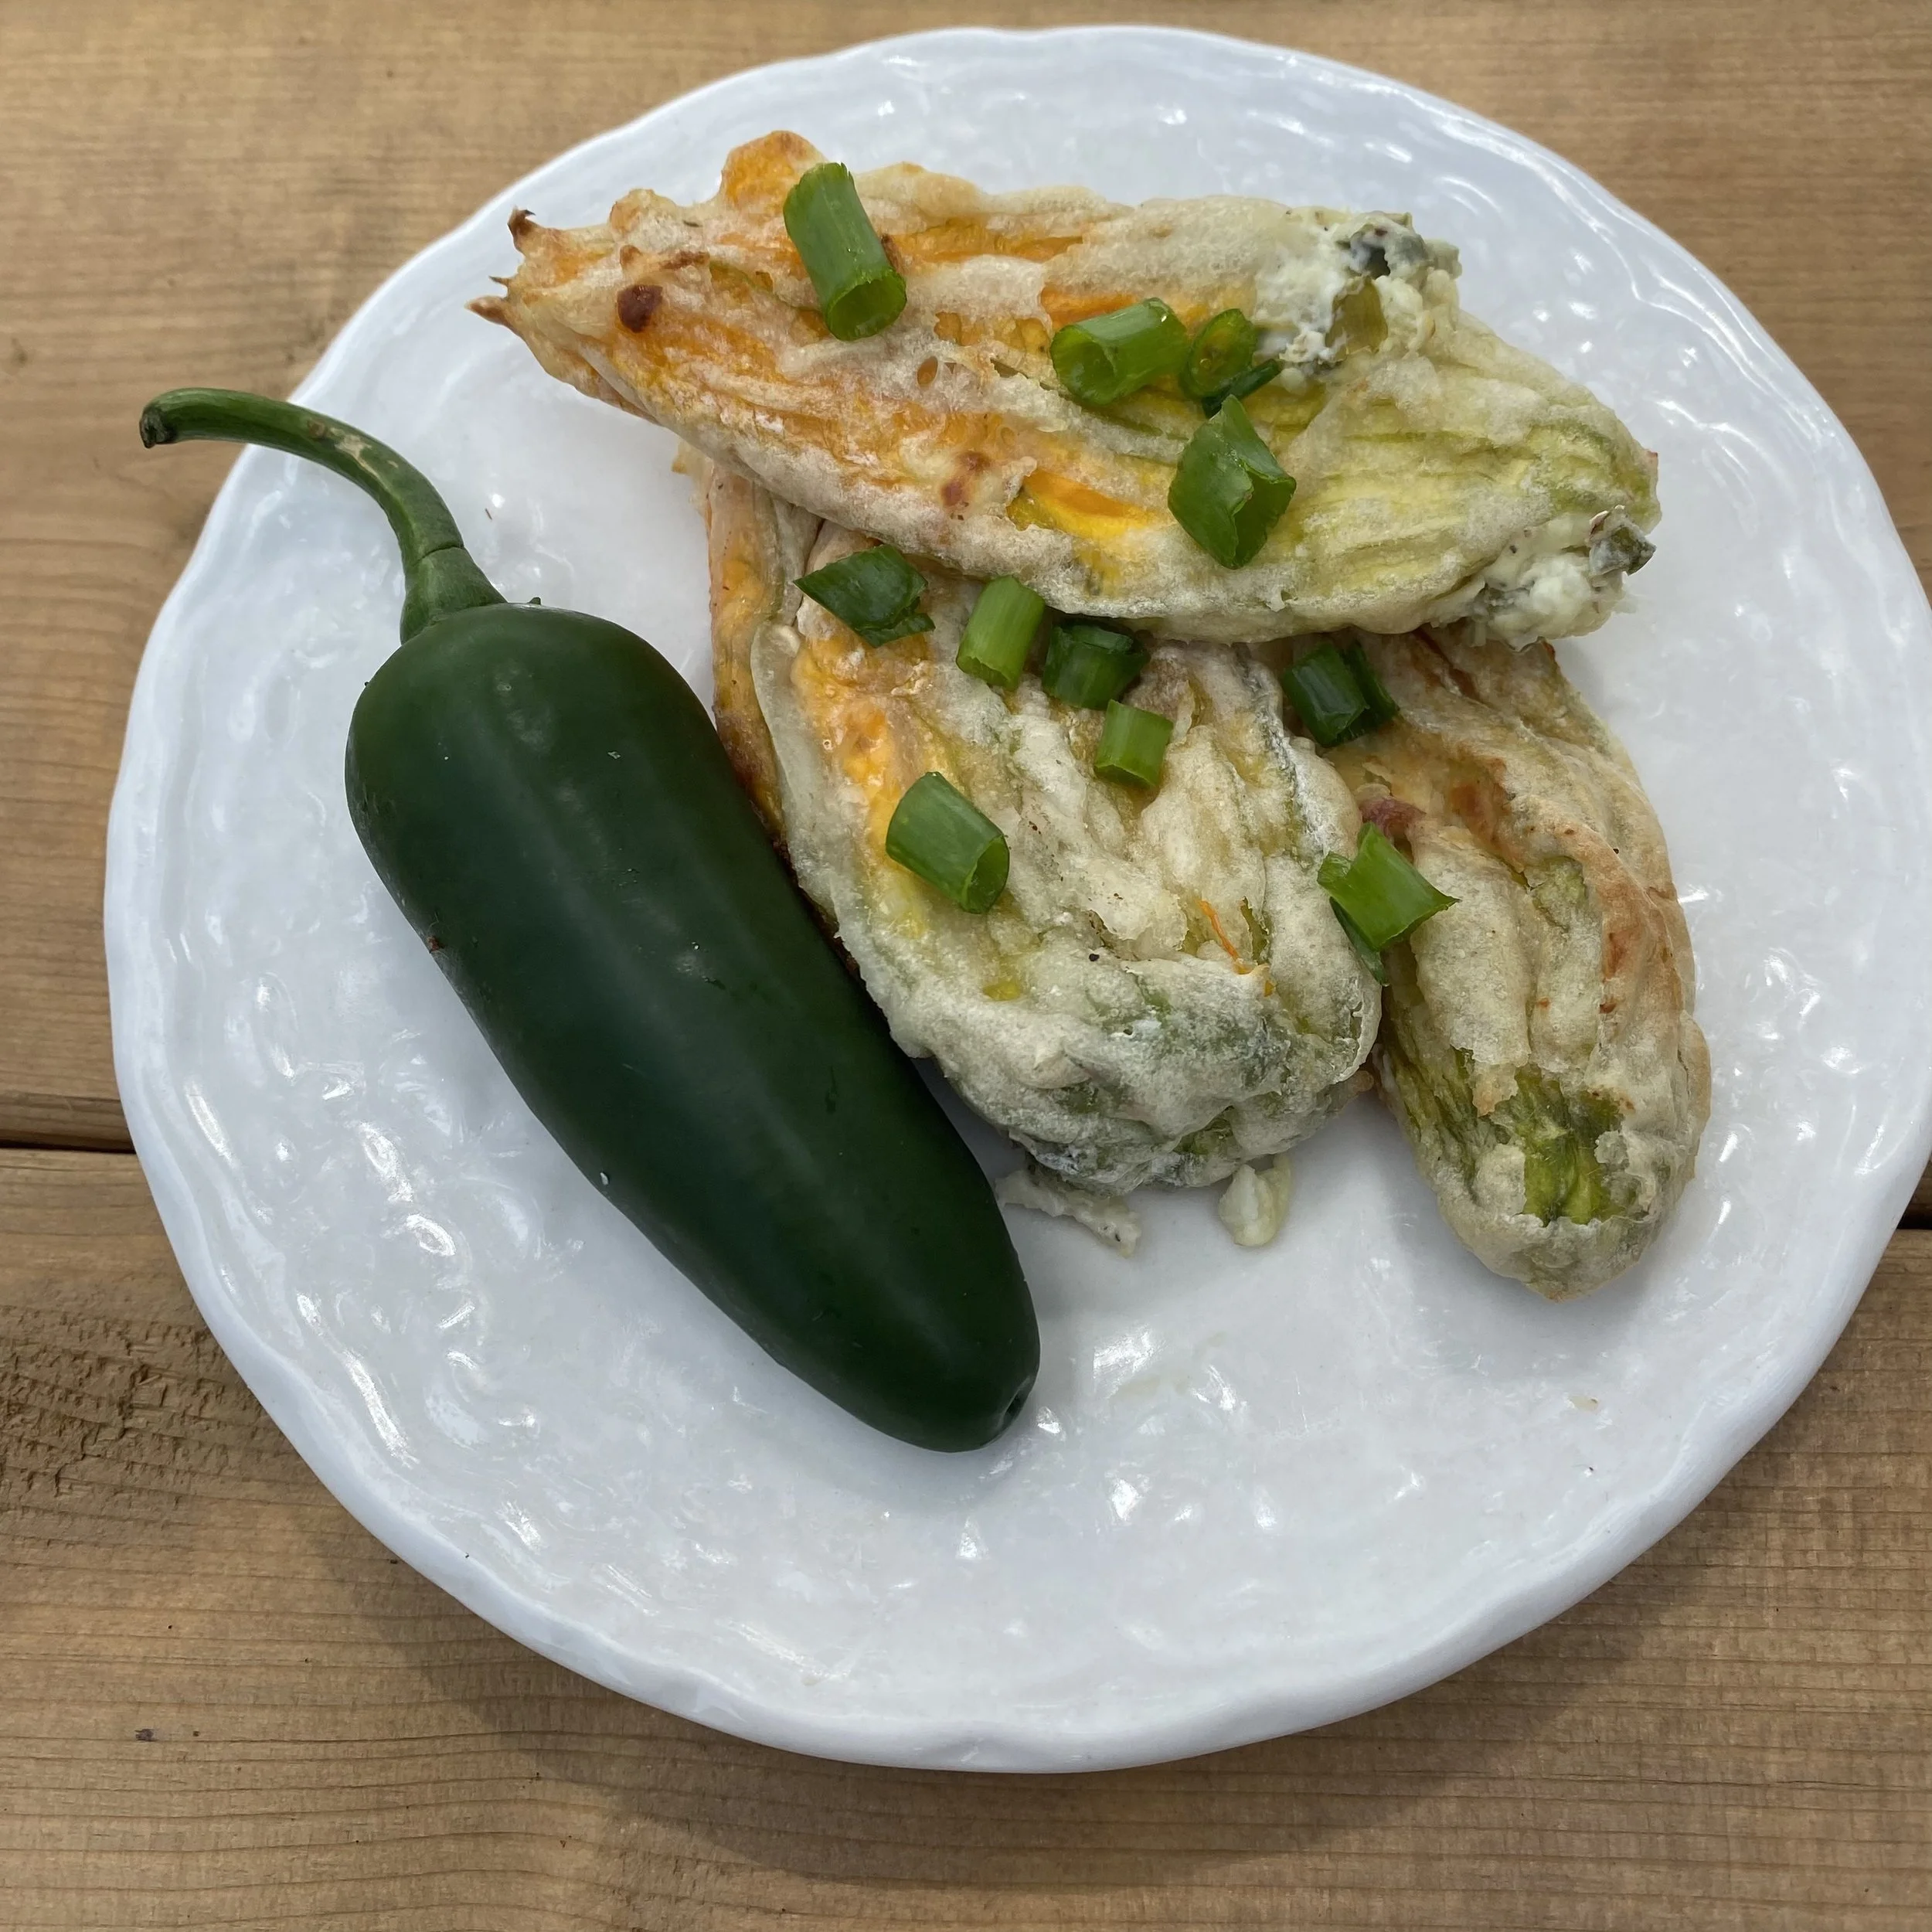
5. Jalapeño (4 blossoms)

2 green onion tops, chopped

1 jalapeño, diced

1 clove garlic, minced

salt & pepper (to taste)

Instructions

  1. Prepare all ingredients according to the suggestions above (e.g., mince, dice, etc.) and set aside.

  2. Gently rinse blossoms with water and dry with a paper towel. It’s okay to open the petals (even if they tear a bit) to ensure there aren’t any bugs. The entire flower is edible, but most people remove the bud from the inside (called the stamen) and the stem from the base of the flower.

  3. In a medium-sized bowl, whisk together the flour and water to create the batter. Set aside for at least 10 minutes.

  4. Preheat air fryer to 370°F.

  5. For each flavour variation, combine all ingredients together in a small bowl and fill each blossom with about 1 ½ tablespoons of the mixture. To make the filling step easier, transfer your filling to a piping bag. If you don’t own one of these, don’t worry! You can make a quick & easy at-home version by filling a Ziploc bag and snipping off one corner.

  6. After the blossoms are filled, carefully coat the outside with batter. Although a bit messy, we found it easiest to do this by hand. Try your best to close the flower so that the filling doesn’t run out when frying.

  7. Evenly coat the air-fryer basket with olive oil and lay down 6 battered blossoms, ensuring they’re evenly spaced. You may be able to fit more depending on the size of your basket.

  8. Fry for 12 min, carefully flipping halfway.

    Tip: After frying, if the blossoms are stuck to the bottom of the basket, give them 10 min to cool and they will be easier to remove.

Recipe developed by Alissa Debruyne and Emma Van der Burg, 2023 Dietetic Interns

Vegetable Personal Pizza

Ingredients

1 whole wheat naan bread

1/4 cup pizza sauce

1/3 cup cheese

1/2 cup diced vegetables (we used sweet peppers, zucchini, and garlic scapes for this one!)

6 pepperoni slices (optional)

Instructions

  1. Preheat the oven to 375°F and line a baking sheet with parchment paper.

  2. Spread the pizza sauce over the naan bread.

  3. Add the cheese on top.

  4. Place the pepperoni slices and vegetables on the naan bread.

  5. Bake at 375°F for 15-20 minutes until the cheese is melted.

  6. This recipe makes one serving, but feel free to make several personal pizzas for your whole family!

This recipe was developed and photographed by dietetic internship student Amy Campbell.

Chocolate Zucchini Loaf

Ingredients:

1 ½ cups all-purpose flour

1 cup whole wheat flour

1/3 cup hemp seeds

½ cup chopped pecans (optional)

½ cup cocoa powder

1 tsp baking soda

½ tsp baking powder

¾ cup sugar

3 eggs

¾ cup canola oil

2 tsp vanilla extract

3 cups grated zucchini (unpeeled)

½ cup chocolate chips (add more or less, depending on preference)

Instructions:

  1. Preheat oven to 350 ̊ F.

  2. Grease two small loaf tins and line with parchment paper.

  3. In a large bowl, whisk together flours, hemp seeds, pecans, cocoa powder, baking soda, baking powder, salt and sugar.

  4. In a medium bowl, beat the eggs. Add the oil, vanilla, and zucchini.

  5. Add the wet ingredients to the dry ingredients and mix until just incorporated.

  6. Fold in the chocolate chips. Divide between the loaf pans.

  7. Bake for 45–55 minutes, or until a toothpick comes out clean when inserted into the middle.

NOTE: the batter will seem quite dry at first but keep mixing and you should end up with a thick, wet batter

Zucchini Cornbread

* Serves 9

Ingredients

1 ½ cup zucchini, shredded

¼ cup granulated sugar

¼ cup light brown sugar

½ cup butter

2 eggs

1 cup buttermilk

½ tsp baking soda

1 cup cornmeal

1 cup all-purpose flour

½ tsp salt


Instructions

  1. Preheat oven to 375 degrees Grease an 8-inch square pan.

  2. Melt butter and add to a mixing bowl. Stir in sugars until well combined. Add eggs and stir well, until combined.

  3. Combine buttermilk with baking soda and stir into the bowl.

  4. Add cornmeal, zucchini, flour, and salt and stir until combined. Avoid over mixing the batter doesn’t need to be completely smooth.

  5. Pour batter into the prepared pan. Bake at 375 degrees for 22-30 minutes, or until a toothpick inserted in the center comes out clean.

  6. Cut yourself a piece of cornbread and top with a little butter and honey and enjoy!

Recipe modified from tastebetterfromscratch.com by Dietetic Intern student Rae Wilcox

Zucchini Alfredo

A fresh, easy, and delicious recipe for you, friends! The zucchini noodles are light & high in fibre and the sauce is rich & creamy — they balance one another out perfectly. Pictured here with a side of tomato salad (roma tomatoes diced & tossed with olive oil, balsamic vinegar, salt, & pepper). Just add a couple slices of crusty bread to sop up the sauce and you’ll be all set. Enjoy!

Zucchini Alfredo.jpg

*Serves 4

Ingredients

6 medium-sized zucchini

4 tablespoons unsalted butter

2 cloves garlic, minced

1 ½ cups half-and-half

2 cups Parmesan cheese

¼ teaspoon salt

¼ teaspoon nutmeg

¼ teaspoon black pepper

Instructions

  1. Spiralize the zucchini, cutting the strands into sections about 8 inches long.

  2. Next, cook the zucchini noodles. Add a tablespoon of cooking oil (my go-to is canola!) to a large skillet and heat over medium-low heat. Continue to cook them while preparing the sauce, stirring occasionally. Add a sprinkle of salt, pepper, and garlic powder. You can add a pinch of red pepper flakes too, for a bit of heat!

  3. To begin making the sauce, melt the butter in a medium-sized saucepan over medium heat until it starts to bubble and sizzle.

  4. Add the minced garlic and saute until lightly browned and fragrant, between 30 seconds and 1 minute.

  5. Next, whisk in the cream. Heat the cream until it simmers, whisking occasionally. This should take 3 – 4 minutes.

  6. Finally, whisk in the parmesan cheese, salt, nutmeg, and pepper.

  7. Cook, whisking occasionally, until the sauce thickens. This should take an additional 3 – 4 minutes. At this point, the sauce should coat the back of a spoon.

  8. Add the cooked zucchini noodles to the prepared sauce and toss to coat.

  9. Serve alongside a salad and some fresh bread for the perfect summer meal!

Recipe developed & photographed by Alex Chesney, RD

Late Summer Chowder

Cooler weather is approaching, the official start of autumn is around the corner, and soup season has arrived! I’m looking forward to being able to comfortably use the stove and oven again and put them to work cooking up the tasty fall recipes I have in mind. To start us off we’ve got a hearty, delicious, and easy chowder. Flavour is built by cooking the vegetables in stages, and coating them with a lovely combination of spices. A low-sodium vegetable broth and just a dash of salt at the end will ensure a hearty-healthy final bowl, and all the wonderful vegetables featured make for a soup that is satisfying and filling. Take advantage of these still-in-season vegetables combined with comfortable cooking temperatures and try this recipe today. Let me know what you think!

Soup to Share.jpg

Ingredients

1 tablespoon oil

1 red onion, diced

3 cloves garlic, minced

1 small jalapeno, diced (more or less, depending on spice tolerance!)

2 bell peppers, diced

2 cobs sweetcorn, cooked & removed from the cob

1 zucchini, diced

5 small red potatoes, cubed

1 teaspoon paprika, oregano, and parsley (each)

½ teaspoon thyme

2 tablespoons flour

3 cups low-sodium vegetable broth

1 cup milk

Salt & pepper, to taste

Instructions

  1. Heat oil in pan over medium-high heat until hot. A handy trick to test the readiness of the pan is to toss in a small piece of diced onion along with the oil. When it starts to sizzle you know you’ve reached the right temperature!

  2. Once hot, add all the onion to the pan. Cook for 5 minutes until translucent and softened.

  3. Add the garlic and peppers and cook for another 5 minutes, stirring frequently.

  4. Add the corn, zucchini, spices, and flour. Mix until vegetables are evenly coated with the spices & flour.

  5. Next, slowly add the vegetable broth, stirring constantly.

  6. Once all the broth has been mixed in, add the potatoes. Lower the heat slightly and bring the mixture to a simmer. Cook for 15-20 minutes, until potatoes are softened.

  7. Add the milk and stir until hot.

  8. Season with salt and pepper, to taste.

  9. Enjoy!

Recipe created by Alex Chesney, RD


Zucchini Lasagna

This neat take on lasagna features zucchini slices instead of pasta noodles. It’s super simple, and super delicious. Zucchini provides lots of fiber, plus vitamins A & C!

*Makes one 9x9 pan of lasagna

Ingredients:
2 large green zucchini, sliced in half and then thinly sliced lengthwise
2 cups tomato sauce (homemade or store-bought)*
½ lb lean ground turkey, cooked
1 cup cheese (mixture of cheddar and mozzarella), grated

Instructions

  1. Preheat oven to 350 F.

  2. Once the zucchini is sliced, it should be briefly pan-fried or grilled to let out some of the moisture. Zucchini has a very high water content, so if it is placed directly into the lasagna, you’ll end up with a watery final product. Fry or grill the lasagna for approximately 2 minutes per side, and then set aside.

  3. Next, thoroughly brown the ground turkey. Divide cooked meat into 2 sections and then set this aside too.

  4. Once the zucchini & turkey have been prepped, it’s time to assemble the lasagna! Making any kind of lasagna is all about the layers. Start off this version by coating the bottom of a 9x9 baking dish with ½ cup tomato sauce. This will prevent sticking. Next, layer slices of zucchini until the bottom of the pan is covered.

  5. On top of the zucchini spread ½ cup of sauce, then sprinkle ¼ cup cheese and half of the ground turkey.

  6. Place another layer of zucchini, sauce, cheese, and meat, then top with one final layer of zucchini. On top of the final zucchini layer, spread the remaining 1 cup of sauce, then sprinkle the remaining ½ cup of cheese.

  7. Bake in preheated oven for 20 minutes, until cheese is melted and browning on top, and sauce is bubbling.

  8. Remove from oven and let sit for 5 minutes, then dig in and enjoy!

* I used a homemade tomato sauce & added my own herbs and spices, which gave me control over the salt content, but if store-bought is your choice, try to choose one that says low/no added sodium. Unfortunately, tomato sauce is often crazy high in salt!

Recipe created by Alex Chesney, RD


Zucchini Blossoms How-To

Zucchini blossoms are a fun treat in season now! They're one of those things that look incredibly impressive once prepared, but are actually really easy - a great way to impress guests! Check out these preparation tips that will help ensure your dinner party is a hit. My go-to cooking method is pan-frying, as it's a nice balance between baking & deep-frying. It gives them a deliciously crisp coating, but allows you to limit the amount of oil used.

Stuff them: 

  • Use a soft cheese (ricotta & goat’s cheese are the most popular) mixed with herbs of your choice (ex. garlic, basil)

  • Gently wipe flowers with a wet paper towel

  • Remove stamen from the center of the blossom, using scissors

  • Mix cheese, herbs & any other desired fillings

  • Use a piping bag to squeeze the cheese mixture into the blossoms (if you don’t have a piping bag, simply use a ziploc bag with the corner snipped off)

  • Twist the tops of the blossoms shut as tightly as possible

Cooking the blossoms, stuffed or un-stuffed:

  • Batter & deep fry the blossoms; use a batter of sparkling water or beer, flour & egg

  • Pan fry the blossoms with olive oil & garlic

  • Drizzle olive oil on the blossoms & bake on a foil-lined cookie sheet

  • Add to pasta, on top of pizza or eat them raw in a salad

Recipe tips & tricks from Alex Chesney, RD